This quilt was made by Maureen using lovely green and brown batiks. It is a gift for her son who loves being outdoors. When we talked about how to quilt it, she wanted to go with the nature theme and was thinking of leaves. I asked how she felt about bears and suggested the pantograph “Deer in the Woods”. It has moose and elk and bears and trees, and I think it’s just perfect for this quilt. It was fun quilting all the different animals, and it will be a lovely gift.
Diesen Quilt hat Maureen genäht und dafür grüne und braune Batikstoffe verwendet. Er ist für ihren Sohn bestimmt, der gern wandert und sehr naturverbunden ist. Sie wollte für das Quiltmuster auch beim Thema Natur bleiben und fragte, ob ich ein Design mit Blättern hätte. Ich hatte beim ersten Blick auf den Quilt sofort das Muster “Deer in the Woods” vor Augen, mit Bären, Hirschen, Elchen und Bäumen. Ich finde, es ist für ihren Quilt einfach perfekt. Und es hat Spaß gemacht, die verschiedenen Tiere zu quilten. Ein sehr schöner Quilt, der bei dem Beschenkten sicher großen Anklang finden wird.
It was pretty clear from the beginning that the May wall hanging would feature a flower. I just wasn’t sure what kind. I am not familiar with “the” mayflower (trailing arbutus), and the pictures I found didn’t really inspire me. Besides, the word “Mayflower” always makes me think of Plymouth Rock and the Pilgrim Fathers, and not an actual flower. After I abandonded this idea, being German made the rest rather easy. The German name for Lily of the Valley translates to “Little May Bells”, and I have always loved these flowers. I am quite happy with the way my Lily of the Valley turned out, and I had fun playing with textures and different fillers to quilt it. I even quilted a Lily of the Valley design on the tan background! The link for the free pattern download can be found at the end of this post.
Dass das Motiv für Mai eine Blume sein sollte, war mir schon relativ früh klar, allerdings wusste ich nicht so recht, was für eine. Es gibt eine Blume, deren englischer Name “Mayflower” ist, aber die ist mir persönlich noch nicht begegnet, und die Bilder, die ich gefunden habe, fand ich aufgrund der doch offenbar sehr kleinen Blüten nicht sehr inspirierend. Und außerdem muss ich bei “Mayflower” immer an Plymouth Rock und die Pilgerväter denken. Nachdem ich diesen Gedanken dann verworfen hatte, bin ich zu meinen deutschen Wurzeln zurückgekehrt und habe mich für ein Maiglöckchen entschieden. Aus deutscher Sicht ist das absolut naheliegend, der englische Name “Lily of the Valley” enthält leider keine Mai-Referenz. Aber Maiglöckchen habe ich schon immer geliebt, also habe ich mich ans Werk gemacht und bin mit dem Ergebnis auch ganz zufrieden. Beim Quilten hatte ich Spaß mit verschiedenen Strukturen und Füllmustern, und auf dem beigen Hintergrund habe ich sogar Maiglöckchen gequiltet. Der Download-Link findet sich wie immer ganz am Ende des Posts.
Edit: Das Muster ist im März 2019 in den Shop umgezogen und kann dort erworben werden.
Edit: The pattern moved to the store in March 2019. If you missed the free download, you can still purchase it there.
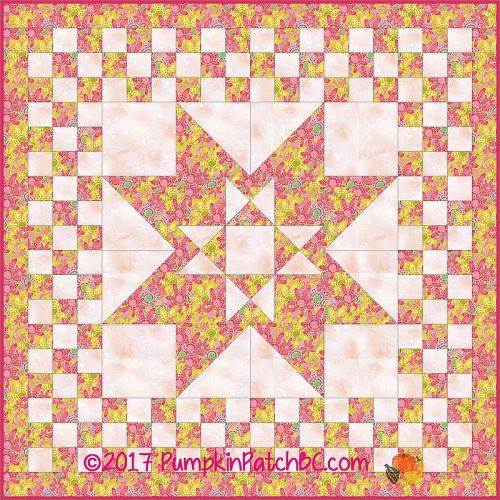
If you are looking for an easy pattern to showcase a pretty large scale print, then Shelby Morris’s “Spring Splash” might be a good choice. It only uses two fabrics (well, three if you include the binding), and the centre star block is 24″. The nine patch blocks in the border are strip-pieced, so the quilt should come together fairly quickly. I am thinking it would also look good in batiks with a dark background, that would really make the colours pop.
Wer auf der Suche ist nach einem Muster, das sich für großgemusterte Stoffe eignet, der könnte mit Shelby Morris’ “Spring Splash” fündig werden. Für diesen Quilt werden nur zwei Stoffe benötigt (okay, drei, wenn man das Binding mitzählt), und der Mittelblock hat mit 24″ eine schöne Größe. Die Nine Patches im Rand werden mit der Strip-Piecing-Methode genäht, so dass dies ein relativ schnelles Projekt sein dürfte. Ich denke, das würde auch gut mit Batikstoffen und schwarzem Hintergrund aussehen, da leuchten die Farben sicher schön.
EDIT: The free pattern doesn’t seem to be available anymore. You can however purchase the patternherenow. Please respect the designer’s copyright and remember how much work goes into designing and writing a pattern. Not everything can be provided for free forever.
Ginger made this Modern Sampler using a duvet cover fabric with pussy willows as her feature fabric. The blocks all have different sizes and are randomly scattered across the white background. For quilting, Ginger asked for a free-motion filler design on the white background and something different on the blocks. The circles in the block design reminded me of the pussy willow fabric, and I resized the design as needed to make it fit. The background filler was inspired by a Matt Wheeler quilt at our quilt guild meeting. When I saw the tiny free motion squares on one of his modern quilts I thought right away that they would be perfect for Ginger’s sampler. So I tried it, and I loved it. And it is much easier to do than meandering because you can cross your previous lines as often as you want to.
Diesen Modern Sampler hat Ginger genäht und als “Feature Fabric” einen Bettbezug mit Weidenkätzchen verwendet. Die Blöcke sind alle verschieden groß und zufällig auf dem weißen Hintergrund verteilt. Sie wollte gern den Hintergrund mit einem Free-Motion-Füllmotiv gequiltet haben und die Blöcke mit einem anderen Muster. Für die Blöcke kam ich ziemlich schnell auf das Design, die Kreise erinnerten mich an die Weidenkätzchen auf dem Stoff, und ich habe die Größe immer nur entsprechend angepasst. Die Inspiration für das Füllmuster kam von Matt Wheeler, der auf unserem Gildetreffen seine Quilts gezeigt hat. Als ich dieses Muster auf einem seiner modernen Quilts sah, wusste ich sofort, dass es genau richtig für Gingers Hintergrund war. Und es ist auch einfacher zu quilten als Stippling, denn man darf die Linien so oft kreuzen, wie man möchte, kann sich also nicht in eine Ecke manövrieren.
Mary made this cheerful quilt for her granddaughter and brought her along to pick a pantograph. The little girl knew exactly what she liked, one look at the butterflies, and she was sold. The pantograph name is “Butterfly Tango”, it works well with the daisy fabrics. The back is a purple Fireside, once again my camera didn’t capture the right colour, it looks much too blue in the picture.
Diesen fröhlichen Quilt hat Mary für ihre Enkelin genäht, und sie brachte das Mädchen auch mit, um das Quiltmuster auszusuchen. Und die Kleine wusste ganz genau, was sie wollte, ein Blick auf die Schmetterlinge (das Muster nennt sich “Butterfly Tango”, und ihre Entscheidung stand fest. Sie passen ja auch gut zu den Stoffen mit den Blümchen. Die Rückseite ist lila Fireside, und auch hier hat meine Kamera mal wieder versagt, die Farbe sieht auf dem Bild viel zu blau aus.
This quilt by Sedef Imer of Down Grapevine Lane measures only 9″ x 12″ but the interesting design caught my eye right away. Sedef wrote the instructions for Caroline Fairbanks-Critchfield’s Monthly Mini Quilts series on SewCanShe. Sedef’s version uses soft, delicate colours and fabrics while Caroline used bright and bold solids for her mini quilt. I love how she used the areas left and right of the bolt to try out different quilting designs. Be sure to check out her other Monthly Minis.
Dieser Quilt von Sedef Imer/Down Grapevine Lane misst nur 9″ x 12″ (ca. 23 cm x 30.5 cm), aber das interessante Design ist mir sofort aufgefallen. Sie hat die Anleitung für die Monthly Mini Quilts von Caroline Fairbanks-Critchfield auf ihrer Website SewCanShe geschrieben. Sedefs Mini Quilt ist in zarten Frühlingsfarben gehalten, während Caroline für ihre Version zu kräftigen Uni-Stoffen gegriffen hat. Besonders gut gefällt mir, wie sie die einzelnen Teile rechts und links vom Blitz in der Mitte genutzt hat, um verschiedene Quiltmuster auszuprobieren. Es lohnt sich auch, einen Blick auf die anderen Monthly Minis zu werfen.
Alida made this Yellow Brick Road quilt top using cozy flannel fabrics. We auditioned a few floral pantographs because of the pansies in the outer border but then decided that an autumn theme would work better with all the leaf fabrics. The pantograph she chose is called “Oak Leaves and Acorns”. It isn’t very visible on the busy fabrics but the backing is a solid cream flannel that shows off the quilting nicely.
Dieses Quilt Top hat Alida nach der Anleitung “Yellow Brick Road” genäht und dafür kuschelige Flanellstoffe verwendet. Wir haben zuerst ein paar blumige Muster ausprobiert, wegen der Stiefmütterchen auf dem äußeren Rand, kamen dann aber zu dem Schluss, dass der Quilt sich doch eher herbstlich anfühlt mit all den Blätterstoffen. Das Muster, das Alida dann gewählt hat, heißt “Oak Leaves and Acorns”. Auf den gemusterten Stoffen kommt es nicht so gut zur Geltung, aber der Rückseitenstoff ist ein cremefarbener Unistoff, und dort kann man es gut erkennen.
Amy Gibson of Stitchery Dickory Dock wrote an excellent article on how to improve your piecing accuracy that is well worth the read. She lists five steps but the fifth deals with math in quilting. While I agree that quilting involves a lot of math, it isn’t necessary to understand the math behind the instructions if you are following a pattern to achieve good piecing accuracy. While I agree with most of what she says, here are a couple of things that I do differently. This is just my personal opinion (and the result of almost twenty years of trial and error). Please read and make your own choice, what works for me doesn’t necessarily work for everyone else.
Amy Gibson/Stichery Dickory Dock hat einen sehr lesenswerten Artikel (auf Englisch) geschrieben, in dem sie fünf Punkte auflistet, die zu besseren Patch-Ergebnissen führen sollen. Der fünfte Punkt beschäftigt sich mit der Mathematik beim Quilten, und natürlich hat sie recht, dass Mathematik eine große Rolle spielt, aber wer nach einer guten und fehlerfreien Anleitung näht, muss sich um die Rechnerei dahinter keine Gedanken machen, um ein gutes Ergebnis zu erzielen. Ich stimme ihr in fast allen Punkten zu, habe aber zwei Anmerkungen, wo meine Methode von ihrer abweicht. Das ist selbstverständlich nur als meine persönliche Meinung zu verstehen (und als Ergebnis von fast 20 Jahren Ausprobieren), was für mich funktioniert, muss nicht jedem liegen.
Ich verwende KEINEN Dampf beim Bügeln von Nähten. Ich halte es nicht für notwendig, und Dampf erhöht in meinen Augen das Risiko, den Stoff aus der Form zu zerren. Ich bügle immer so heiß wie möglich, und wenn die Blöcke komplett fertig sind, drücke ich auch schon mal die Dampfstoßtaste, achte dann aber darauf, dass ich das Eisen auch wirklich nicht bewege.
I do NOT use steam while pressing. I don’t think it’s necessary, and the risk of distorting the fabric is higher with steam. I use the highest cotton setting while piecing and only add steam when I give my finished blocks a final press. And even then I only manually push the steam button and make sure that I don’t move the iron at all.
And I am not a fan of spray starch. I use Mary Ellen’s Best Press instead. (And I am not getting paid to endorse the product, I just happen to like it.) I used spray starch a long time ago and then gave it up at some point because it made the fabric sticky. That might have been the fault of the brand I was using but in any case, I didn’t like it. When I started working at the quilt shop, one of my co-workers recommended Best Press to me. I didn’t think it was necessary, I had been quilting without starch for at least ten years, and it worked, didn’t it? Then I won a small bottle of Best Press at a Christmas party game. So I figured I might as well try it. And the rest, as they say, is history. I loved it so much that I am buying it by the gallon now.
Und ich bin auch kein Fan von Sprühstärke. Ich verwende stattdessen Mary Ellen’s Best Press. (Und ich werde nicht dafür bezahlt, dass ich dieses Produkt empfehle, ich komme damit nur wirklich gut zurecht.) Am Anfang meiner Quilterkarriere habe ich Sprühstärke verwendet, das aber bald aufgegeben, ich fand, dass der Stoff dadurch nur klebrig wurde. Das mag an der Marke gelegen haben, aber es hat mir jedenfalls nicht zugesagt. Als ich dann anfing, im Quilt Shop zu arbeiten und eine meiner Kolleginnen mir Best Press empfahl, habe ich dankend abgelehnt. Ich hielt es nicht für nötig, schließlich nähte ich seit mindestens zehn Jahren ohne Sprühstärke, und das funktionierte doch auch gut. Dann habe ich bei einer Weihnachtsfeier eine kleine Flasche Best Press gewonnen. Und da ich es nun schon mal im Haus hatte, habe ich es dann auch ausprobiert. Und was soll ich sagen… es macht einen großen Unterschied, und ich kaufe jetzt Literflaschen.
This is one of the greatest quilts I have ever seen, and I felt very honoured that Kris asked me to quilt it for her. She made it as a gift for her daughter and family. The pattern is by Amy Bradley Designs and comes with many options to customize. I spent a lot of time just looking at all the beautiful details. For quilting I tried to stay away from the appliqué as much as possible and just added texture where needed. The outer border called for cross hatching, and Kris had requested something with leaves for the inner borders, so I drew a continuous maple leaf design and resized it as needed. The loopy design between the two camper blocks picks up the loops in the small inner border. I spent a lot of time on this quilt and I am quite happy with the result.
Von diesem Quilt bin ich total begeistert, und ich fühlte mich sehr geehrt, dass Kris mich bat, ihn für sie zu quilten. Sie hat ihn als Geschenk für ihre Tochter und deren Familie genäht. Das Muster stammt von Amy Bradley Designs und bietet viele Möglichkeiten, den Quilt individuell anzupassen. Ich habe viel Zeit damit verbracht, einfach nur die ganzen liebevollen Details anzusehen. Beim Quilten habe ich mich bemüht, mich möglichst von den Applikationen fernzuhalten und nur ein bisschen Struktur zu geben, wenn nötig. Der äußere Rand rief förmlich nach diagonalen Linien, und Kris hatte für den inneren Hintergrund um Blätter gebeten, also habe ich – ganz kanadisch – Ahornblätter gezeichnet und dann die Größe nach Bedarf angepasst. In diesen Quilt habe ich eine ganze Menge Zeit investiert, und es hat sich gelohnt, ich bin mit dem Ergebnis zufrieden.
I am still working on using up my scraps and made another scrap quilt. Since I got bored of the pattern I changed it a little this time. The basic idea of alternating scraps and background fabric is still the same but I only used two small squares instead of four. It still looks very similar but I had to pay attention when I was sewing. For quilting I started out with diagonal lines through the white squares and then added designs to fill the blocks. This quilt will be donated to the Chilliwack Piecemakers Quilting Guild’s “We Care” Program.
Ich versuche immer noch, meine Reste aufzubrauchen, daher habe ich einen weiteren Restequilt genäht. Allerdings wurde es langweilig, immer das gleiche Muster zu nähen, und ich habe ein bisschen variiert. Die Grundidee ist noch immer die gleiche, Reste und Hintergrundstoff wechseln sich ab, aber bei diesem Quilt habe ich nur zwei kleine Quadrate aneinandergenäht und nicht vier. Das Muster sieht dem Original immer noch sehr ähnlich, aber ich musste beim Nähen schon aufpassen, dass ich nicht durcheinander komme. Gequiltet habe ich zunächst diagonal durch die weißen Quadrate und dann die dadurch entstandenen Blöcke mit weiteren Mustern gefüllt. Diesen Quilt habe ich als Spende für das “We Care” Programm der Chilliwack Piecemakers Quilting Guild genäht.